When streaming on Twitch, there are all sorts of things you can do to make your show more enjoyable to watch. General ‘watchability’ is a big topic for streaming, and there are a lot of angles from which you can tackle the problem. In fact, I’ve spoken about it in a few different places throughout The Twitch Playbook already. Probably the most direct was the entry Easy Ways to Make Your Streams More Watchable, in which I went over all sorts of ways to make a Twitch stream more accessible for the viewers at home- from stream software settings to how you conduct yourself as the streamer. In this entry, I want to zero in on one specific aspect of making your streams easier to follow along with, which anyone who plays video games on stream can implement. We’re going to take a second to tweak some of the settings in the games you play.
➢ SET YOUR VISUALS
One quick and easy setting that can help make your streams easier to follow is a simple toggle switch. Twitch viewers often appreciate when you enable subtitles in the games you play. This is true for many reasons: of course, it assists the hard of hearing, but it also helps people to understand what’s going on if you’re speaking over the characters in the game. On top of that, many Twitch viewers watch streams in public or at work (shoutout to those who risk getting in trouble with the boss to watch our shows, by the way!) These viewers have to watch at either a lowered volume, or with the sound completely disabled. In all of these cases, having subtitles makes it easier for someone to follow along. Now, subtitles are more important in certain types of games than others, but if you’re playing something with dialogue and don’t mind having words on screen, give these a shot for an easy boost to watchability!
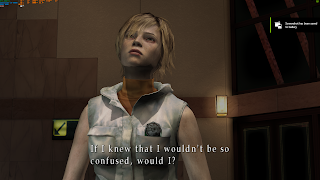 |
| Exactly. |
Another visual option that can assist viewers is put in front of you when you first boot up almost any video game: the brightness slider. As I’ve mentioned in earlier Twitch Playbook entries, broadcasts tend to appear darker for the viewer than they do on your screen while you’re playing the game. This means that in some games, when it’s night time or the lights are out in a haunted house, the action can be so dark that the viewer is completely unable to see what’s happening. In any game you play, I suggest turning up the ‘Brightness’ slider a few pips past where you think it’s meant to be. This will ensure that your viewers are able to enjoy the show along with you. Believe it or not, this one change alone has gotten me tangible increases in viewer retention, at different points in my Twitch career.
➢ MIX YOUR SOUND
In past entries like Optimize Your Stream Audio Without Buying a New Mic, I explained the importance of sound mixing. In that one, I mostly focused on how you can mix audio in your streaming software. But it’s also possible to alter aspects of the sound mix in almost every video game available today! Taking a few minutes to tweak these settings can net you some extra points for viewer accessibility.
The first sound setting you should look for is the Dynamic Range. I would say that the majority of games have this, though it’s sometimes listed under different names. You’ll know the Dynamic Range setting because it asks you to choose between sound options like ‘Large Speakers,’ ‘Small Speakers,’ ‘Headphones,’ and ‘Home Theater.’ This is a mysterious setting to most people, and some tend to opt for the larger choices like ‘Home Theater,’ assuming that they output higher quality audio. This is a misconception, and can make your game’s sound mix more difficult to understand on a Twitch broadcast. What Dynamic Range actually does is control the difference between the loudest sounds in a game and the quietest ones. This may not sound like a big deal, but if you’ve ever tried to watch a Christopher Nolan movie like Tenet or Interstellar on headphones or a normal TV speaker, you’ve likely experienced just how much dynamic range can affect you. Nolan is notorious for using an extremely high dynamic range in his movies, and while this sounds great in a movie theater, watching these movies at home usually means that explosions are loud enough to bother your neighbors while dialogue is whisper quiet. And while your game’s settings may not be that severe, it’s still typically best to choose the ‘Headphones’ option.
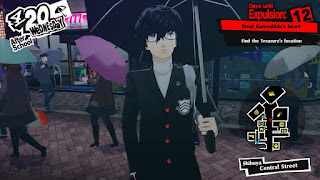 |
| Persona 5 has a killer soundtrack, so maybe keep the music all the way up for that one. |
Then there are the individual sound settings. Most video games will give the option to tweak the volume levels of various types of sounds. The most common sliders you’ll see are for ‘Voice,’ ‘Effects’ and ‘Music,’ though some games have even more to choose from. Using these, you can optimize the audio for the kind of stream you’re trying to produce. If you want to play your own custom soundtrack during the game, turning the ‘Music’ slider all the way down will prevent the game’s own music from getting in the way of yours. If you don’t want to hear the grunts and yelps every time your character moves around or gets attacked in a multiplayer shooter, you can remove the ‘Voice’ track. I personally use these settings all the time in story-based singleplayer games by turning the ‘Effects’ and ‘Music’ sliders to about 80% while ‘Voice’ stays at 100%. This ensures that everyone can always hear what characters are saying, even when there’s a lot of action happening. One other useful setting to keep an eye out for is ‘Streamer Mode.’ This will automatically disable licensed music while you play the game, so you don’t have to worry about getting in trouble with copyrights.
➢ SMOOTHER GAMEPLAY
There are a few settings which can help you have a smoother time in the games you play as well. Stream hiccups mean less entertainment for the viewers after all, and keeping your shows in good working order will also help with watchability. For PC players, especially those with multiple monitors, you may find a lot of use in the ‘Borderless Fullscreen’ display option, rather than normal ‘Fullscreen.’ This prevents the game from causing as many problems when you need to switch away from it to type in your chat, and can sometimes even help performance.
Speaking of performance, it’s always good to make sure your graphics settings are appropriate. This applies to PC players, and even some console ones, as certain console games now have options like ‘Performance Mode’ and ‘Resolution Mode.’ Graphics settings will always be up to your personal preference, but sometimes you may be pulling more power from your machine than is required for the stream. For example, if your stream outputs at 720p, then it’s not necessarily as important to get every single pixel of detail from the game in the graphics settings. Even if it looks good on your 1080p monitor at home, the viewer isn’t really seeing the difference that some of these graphics settings make. But your machine may be dropping the game’s framerate due to those unnecessary settings. It’s sort of a ‘worst of both worlds’ scenario. Since streamers who aren’t Partnered often don’t get variable quality options on their streams, outputting at high resolutions like 1080p is typically only going to hurt your shows anyway. So if you want to take some pressure off your machine and your stream, try going for performance over resolution. It’ll make your games run smoother, and that definitely helps watchability.
➢ TAKE THE TIME
What I’ve described in this entry are some settings I’ve had success with at various points in my streaming career. But depending on which games you play, there will be other options available to tweak as well. Try taking some time to experiment with some of the tools at your disposal. Sometimes the simplest change can make a big difference. If you stream video games, the viewers will be seeing your game for most of the show. Why not do your best to make sure it looks and sounds as good as possible, by finding a few stream-friendly game settings?
No comments:
Post a Comment